| <!--QiQu--> |

|
|
|
Home
Introduction Documentation QiQu Language QiQu Tutorials QiQu Samples State Machine Xml Mpe FW QiQuGen Developer's Corner Downloads Screenshots Contact Sponsoring |
Xml Multipage Editor Framework
Download the XML-Multipage-Editor framework here
1 IntroductionA lot of configuration is done in xml files. Since the semantic of those files vary, it is often not enough to have a simple xml editor to edit those files. Of course, defining a DTD or an xml schema does improve the situation a lot by providing code assist functionality, however, that is not enough. Often, it is necessary to provide data which could be defined in other files, systems, repositories and so on, that are not accessible by a simple xml editor What a software engineer likes to have is an editor, that enables him to link data from other resources. Of course, it is always possible to write such an editor from scratch, however, this means a lot of work to do. Therefore, the goal of this personal study project was to find an easy and extendible way in order to write specialised xml editors. 2 ConceptDuring my work with eclipse, I learned to appreciate the specialised xml editors which are common in the plugin development environment (namely the plugin.xml, feature.xml and site.xml editors). Furthermore, being one of the core developers of QiQu (www.qiqu.org), I do have a lot of experience in writing code generators. Those facts led me to the following layered architecture:
Since this is a personal study project, I did not make a complete product. For example, a lot of classes which are referenced from the MpeFw layer, are internal classes of eclipse. Moreover, I did not create any jar files of the framework. I simply do provide an eclipse java project which has 3 source folders: srcfw contains the MpeFw framework classes, srcgen is the output folder of the generator and src will contain the classes written by the user. 3 InstallationFirst thing you have to do is to install QiQu (www.qiqu.org). Next, import the following projects into your workspace:
Now, we are ready to go. 4 Create the first editorThe main task of the generator is to create the java-model classes, which define the structure of the xml-document to be modified by the editor. Therefore, we need a description of this structure, that can be used as an input. The easiest way to do is, is to have an xml-document, that follows the QiQu rules for xml-documents. This is actually one simple rule. If a node can have multiple entries of the same type, they must be collected under special node. This name of this node is the same as the elements plus the ending "list". E.g., if there is a parent node that can have multiple child nodes, the structure of the xml document must be: <parent> <childlist> <child name="first"> <child name="second"> </childlist> </parent> If an xml-document follows this rule, we can directly use the xml-document itself as input of the generator. And of course, our first example will follow this rule: <data> <personlist> <person id="1" name="John"> <adress street="first avenue" city="LA"/> <buddylist> <buddy personid="2"/> </buddylist> </person> <person id="2" name="James"> <adress street="victory place" city="London"/> </person> </personlist> </data> This file is saved under "MpeFwGenerator/model/input/qiquStyleExample.xml". Now, let's get our hands dirty and generate some code. Open the QiQu-script "MpeFwGenerator/script/generateForQiQuStyle.qiq". The first lines of the script are parameters, which can be configured. "InputModel" is the xml-document, that follows the QiQu-style rules: our "qiquStyleExample.xml" document. "BasePath" is the folder in which the files should be generated. Next comes the parameter, which defines the package in which the model classes should be placed, followed by the parameter defining the home of the generated editor related classes. Since those parameters are preconfigured for this example, there is no need to change them. In order to generate the code, open the context-menu of the file "generateForqiQuStyle.qiq" and select "QiQu/Run QiQu Script". 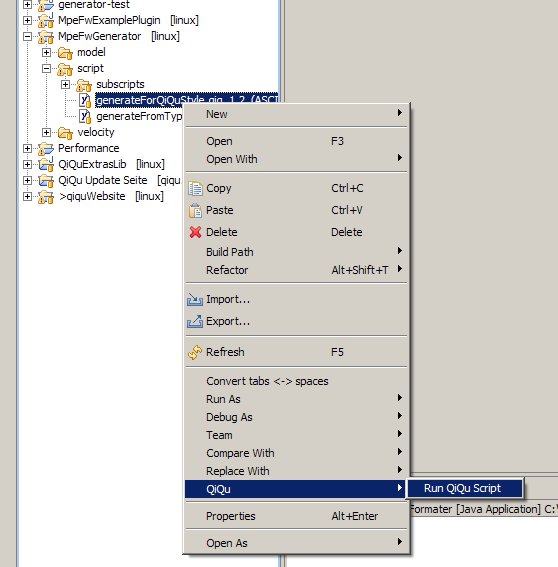 Within a second, QiQu has launched the script and you can see the result in the "srcgen"-folder of the "MpeFwExamplePlugin" project. Next, we need to implement three classes. The first is the main editor class, which is extended from AbstractMpeFwEditor. There are two methods which have to be implemented:
	package ch.aloba.mpeeditor.editor;

	import ch.aloba.mpefw.configuration.ConfigurationFactory;
	import ch.aloba.mpefw.editor.AbstractMpeFwEditor;

	public class ExampleEditor extends AbstractMpeFwEditor
	{
	    /**
	     * @see ch.aloba.mpefw.editor.AbstractMpeFwEditor#checkFileName(java.lang.String)
	     */
	    protected boolean checkFileName(String filename)
	    {
	        return "qiquStyleExample.xml".equalsIgnoreCase(filename);
	    }

	    /**
	     * @see org.eclipse.ui.forms.editor.FormEditor#addPages()
	     */
	    protected void addPages()
	    {
	        addSourcePage(ConfigurationFactory.getConfiguration().getContextId());
	    }
	}
The first method defines the files, which the editor can open. The second defines the single pages of the editor. For the moment, we just define a sourcepage. Next, the UndoManager has to be implemented. The generator has already created a specialized abstract implementation named "Abstract[NameOfTheRootNode]UndoManager". In our case, this is "AbstractDataUndoManager", since the name of the root node is "<data>". So let's implement the concrete implementation of this class:
	package ch.aloba.mpeeditor.editor;

	import ch.aloba.editor.AbstractDataUndoManager;
	import ch.aloba.mpefw.editor.AbstractMpeFwEditor;

	public class ExampleEditorUndoManager extends AbstractDataUndoManager
	{
	    /**
	     * @param editor
	     */
	    public ExampleEditorUndoManager(AbstractMpeFwEditor editor)
	    {
	        super(editor);
	    }

	    /**
	     * @see org.eclipse.pde.internal.ui.editor.ModelUndoManager#getPageId(java.lang.Object)
	     */
	    protected String getPageId(Object object)
	    {
	        return null;
	    }
	}
"getPageId" defines the page, that should be activated in case of a redo. If we return null, then the current page of our multipage editor stays active. The next thing we have to do, is to implement the configuration class. The configuration class must be implement the IMpeFwConfiguration interface.
	public class ExampleConfiguration implements IMpeFwConfiguration
	{
	    private AbstractModelMpeFw m_model = null;

	    /**
	     * @see ch.aloba.mpefw.configuration.IMpeFwConfiguration#logException(java.lang.Exception)
	     */
	    public void logException(Exception e)
	    {
	        TestMultiPageEditorPlugin.getDefault().logException(e);
	    }

	    /**
	     * @see ch.aloba.mpefw.configuration.IMpeFwConfiguration#getPluginId()
	     */
	    public String getPluginId()
	    {
	        return TestMultiPageEditorPlugin.getDefault().getPluginId();
	    }

	    /**
	     *
	     * @see ch.aloba.mpefw.configuration.IMpeFwConfiguration#getPlugin()
	     */
	    public AbstractUIPlugin getPlugin()
	    {
	        return TestMultiPageEditorPlugin.getDefault();
	    }

	    /**
	     *
	     * @see ch.aloba.mpefw.configuration.IMpeFwConfiguration#getActiveWorkbenchShell()
	     */
	    public Shell getActiveWorkbenchShell()
	    {
	        return TestMultiPageEditorPlugin.getActiveWorkbenchShell();
	    }

	    /**
	     *
	     * @see ch.aloba.mpefw.configuration.IMpeFwConfiguration#getActionImageDescriptors(java.lang.String)
	     */
	    public ImageDescriptor[] getActionImageDescriptors(String imageName)
	    {
	        return TestMultiPageEditorPlugin.getActionImageDescriptors(imageName);
	    }

	    /**
	     * @see ch.aloba.mpefw.configuration.IMpeFwConfiguration#getResourceString(java.lang.String)
	     */
	    public String getResourceString(String key)
	    {
	        return "";
	    }

	    /**
	     * @see ch.aloba.mpefw.configuration.IMpeFwConfiguration#getContextId()
	     */
	    public String getContextId()
	    {
	        return "example-context";
	    }

	    /**
	     * @see ch.aloba.mpefw.configuration.IMpeFwConfiguration#instantiateModel(org.eclipse.core.resources.IFile)
	     */
	    public AbstractModelMpeFw instantiateModel(IFile file)
	    {
	        m_model = new DataModel(file);
	        return m_model;
	    }

	    /**
	     *
	     * @see ch.aloba.mpefw.configuration.IMpeFwConfiguration#getModel()
	     */
	    public AbstractModelMpeFw getModel()
	    {
	        return m_model;
	    }

	    /**
	     * @see ch.aloba.mpefw.configuration.IMpeFwConfiguration#getUndoManager(ch.aloba.mpefw.editor.AbstractMpeFwEditor)
	     */
	    public AbstractMpeFwUndoManager getUndoManager(AbstractMpeFwEditor editor)
	    {
	        return new ExampleEditorUndoManager(editor);
	    }

	    /**
	     * @see ch.aloba.mpefw.configuration.IMpeFwConfiguration#getContentOutline(ch.aloba.mpefw.editor.AbstractMpeFwEditor)
	     */
	    public ISortableContentOutlinePage getContentOutline(AbstractMpeFwEditor editor)
	    {
	        return null;
	    }
	}
The methods logException, getPluginId, getPlugin, getActiveWorkbenchSchell, getActionImageDescriptors, getResourceString contain mainly a forwarding to the appropriate Method in the main plugin class. GetContextId defines a unique string. That is used to identify the inputcontext of the editor. InstantiateModel is called once and instantiates the concrete model. The instantiate model is stored locally and can be retrieved afterwards by calling the getModel Method. In getUndoManager, the concrete undomanager has to be instantiated. The method getContentOutline defines the content of the outline view. Since we have not defined one, we simply return null. Therefore, the outline view will stay empty if our editor is activated. The only thing left to do, is to write the plugin class und to configure the plugin.xml file. The plugin class is contained in the source and is named ExampleEditorPlugin. Note that the "Configuration" is set via the ConfigurationFactory in the constructor. The plugin configuration does contain 2 points worth to mention. First, in the "MANIFEST.MF" you need to have the line "Eclipse-AutoStart: true". Second, when defining the Editor in the plugin.xml, you need to provide a contributor class. For that, you can use the class "MpeFwStandardEditorContributor". The resulting editor extension point in the plugin.xml should look like the following one: <plugin> <extension point="org.eclipse.ui.editors"> <editor class="ch.aloba.mpeeditor.editor.ExampleEditor" contributorClass="ch.aloba.mpefw.editor.MpeFwStandardEditorContributor" extensions="xml" icon="icons/sample.gif" id="MpeFwExamplePlugin.editor1" name="Editor 1"/> </extension> </plugin> That's all. So let's configure an appropriate Eclipse Application Run and start it. Create a testproject and copy the "qiquStyleExample.xml" into it. Double-click the file and an multipage editor with one page should be opened. 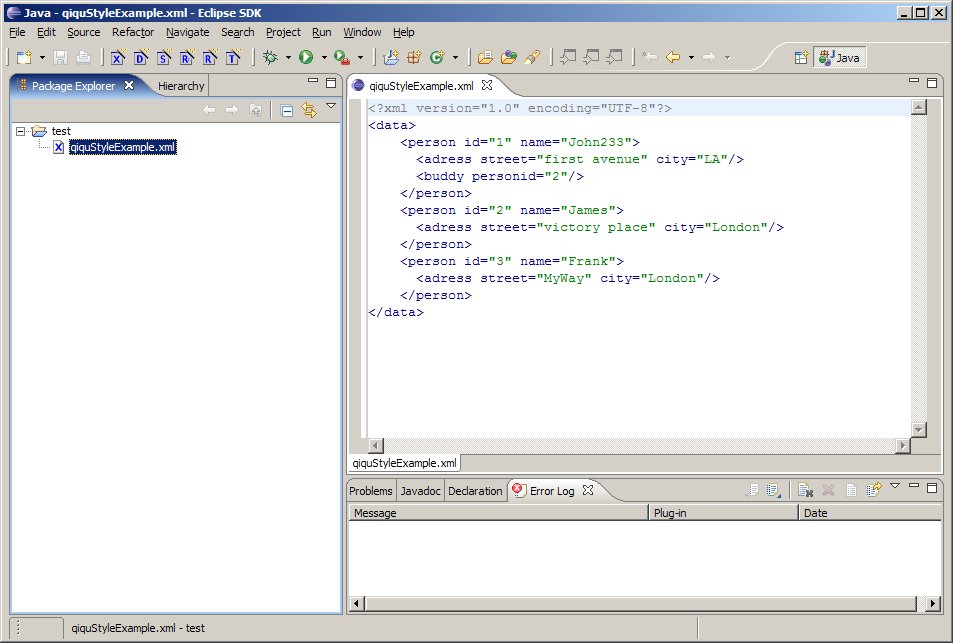 I admit, this doesn't look very spectacular, since a simple text editor will provide the same results. However, behind the curtain, the xml-file is represented internally as a model out of instances. This models handles the states of the content and of course, it's also possible to register listeners and be informed about model changes in any of the pages. So let us put a little bit more life in it by ? 5 Adding a PageWe are going to implement a MasterDetail Page. The list on the left side will contain the persons and the details of the selected entry will be displayed on the right side. Again, I will do the implementation based on PDE internal classes: PDEFormPage, PDEMasterDetailsBlock and PDEDetails, so that ye can directly compare our page with implementations of the plugin, features and site editor. I will just present you the resulting files for this MasterDetail Page. The implementations follows closely the one of the ExtensionPage of the Plugin Editor. However, I tried to keep it more simple. The implementation consist out of 3 files:
In order to activate the page, you need to add it in the addPages() Method of the ExampleEditor:
	    protected void addPages()
	    {
	        try
	        {
	            addPage(new MainExamplePage(this));
	        }
	        catch (PartInitException e)
	        {
	            ConfigurationFactory.getConfiguration().logException(e);
	        }
	        addSourcePage(ConfigurationFactory.getConfiguration().getContextId());
	    }
Note that the MainSection and the PersonDetailsPage register themselves as modelchange-listeners directly at the model. That's the way how they are informed of changes in other pages (like the sourcepage) or other parts of the same page. 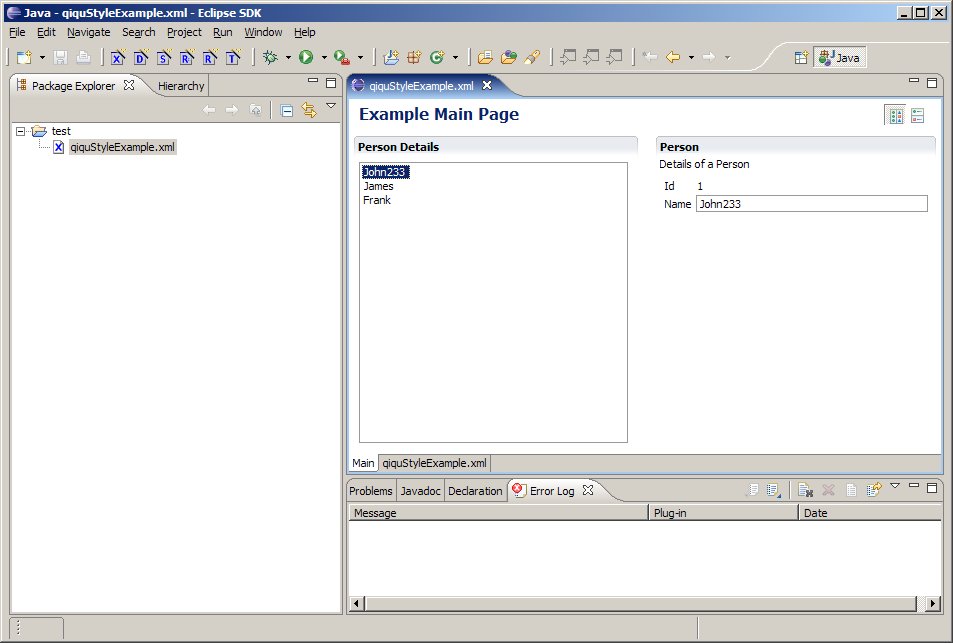 6 Generate an Editor for an "none-QiQustyle" Xml-DocumentIf you have a QiQustyle xml document, then our generator creates an "typemodel.xml" out of the original input xml (located in the directory model/input/ of the the project MpeFwGenerator). However, it is also possible to create this document manually. So, let's see how this is done. Let us assume, we do have the same structure of a document, as we had before. However, this time, person entries are encapsulated in a "persons" entry and buddy entries are encapsulated in a "buddies" entry. So let's take the "typemodel.xml" from the QiQustyle example and adapt it as follows: <Typelist> <Type name="data" isRoot="true"> <Attributelist/> <Subelementlist> <Subelement name="person" type="many" listname="persons"/> </Subelementlist> </Type> <Type name="person"> <Attributelist> <Attribute name="id" type="String"/> <Attribute name="name" type="String"/> </Attributelist> <Subelementlist> <Subelement name="adress" type="single"/> <Subelement name="buddy" type="many" listname="buddies"/> </Subelementlist> </Type> <Type name="adress"> <Attributelist> <Attribute name="street" type="String"/> <Attribute name="city" type="String"/> </Attributelist> <Subelementlist/> </Type> <Type name="buddy"> <Attributelist> <Attribute name="personid" type="String"/> </Attributelist> <Subelementlist/> </Type> </Typelist> That's all we had to do, so let's generate the new model. As a matter of fact, only the classes Person and Data in the package model are different, their write and parse method are reflecting now our changes. The editor itself will work as it is, just ensure that the xml-document you are going to edit contains the new names. Go and try it by adjusting the "generateFromTypeModel.qiq" script and running it afterwards. How can we handle "one-many" relations, if they child elements are not grouped under a special element? Well, simply write "NONE" in the listname. <Typelist> <Type name="data" isRoot="true"> <Attributelist/> <Subelementlist> <Subelement name="person" type="many" listname="NONE"/> </Subelementlist> </Type> <Type name="person"> <Attributelist> <Attribute name="id" type="String"/> <Attribute name="name" type="String"/> </Attributelist> <Subelementlist> <Subelement name="adress" type="single"/> <Subelement name="buddy" type="many" listname="NONE"/> </Subelementlist> </Type> <Type name="adress"> <Attributelist> <Attribute name="street" type="String"/> <Attribute name="city" type="String"/> </Attributelist> <Subelementlist/> </Type> <Type name="buddy"> <Attributelist> <Attribute name="personid" type="String"/> </Attributelist> <Subelementlist/> </Type> </Typelist> Again, just the classes Data and Person in the model package will change. 7 SummaryWith the help some of simple QiQu scripts and a couple of Velcotiy templates, I showed you an easy way to create "plugin.xml - editor like" xml-editors for any xml document. You've seen that only a couple of lines need to be written manually, before you can launch an editor with a single sourcepage. However, the implementation of other pages is still your task ;-). As you know, I based the framework classes heavily on internal PDE classes. Even if this is not the best solution, it is a practical solution that gives good result without investing too much time. The drawback is, that those classes and interfaces may change in future eclipse versions? I actually had three main goals, with this project: First, I wanted to show how QiQu can be used during development, without writing a standalone or completely in Eclipse integrated generator simply adjust the script and run them via the context-menu. Second, I wanted to provide an easy way to create a customized "plugin.xml - editor like". And third, I want you to realize your own ideas with QiQu and the provided framework classes. As a spark, that hopefully starts the fire in you, I have a couple of ideas to extent the framework and/or generator:
|