| <!--QiQu--> |

|
|
|
Home
Introduction Documentation QiQu Language QiQu Tutorials QiQu Tutorial Extending QiQu Property Dialog Performance QiQu Samples Developer's Corner Downloads Screenshots Contact Sponsoring |
Extending The QiQu Script Language
Download the tutorial project here
The QiQu-Script language can be extended in two ways. First, you can extend the language with new commands and second, you can add new text functions two the language. 1 Setting up an Eclipse-Javaproject to extend QiQuCreate a new Java Project in Eclipse. Configure the source and output folders (e.g. source folders "src/java" and "src/javatest"; output folder "bin/classes"). Open the project properties and select "Java Build Path" and choose the register "Libraries". Press the "Add Library..." - button, select "User defined Libraries" and finally check mark "QiQu Libs" entry. This will add all necessary Jar-files to the classpath of your project. 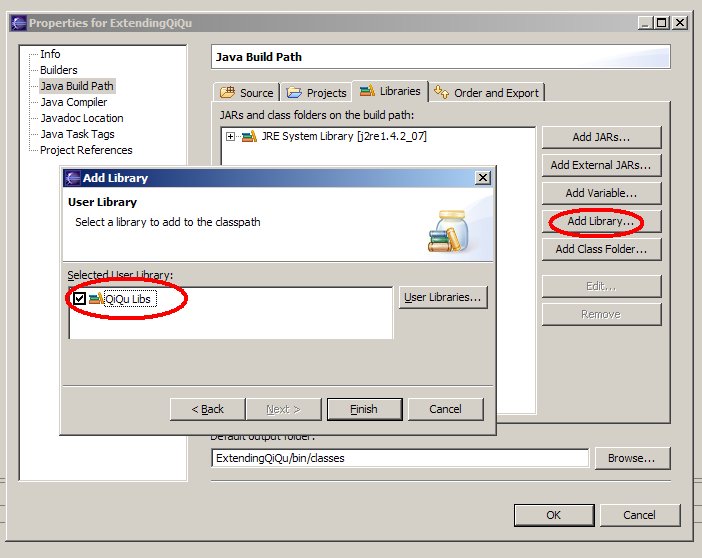 Done that, your project should look somehow like the one in the next picture. 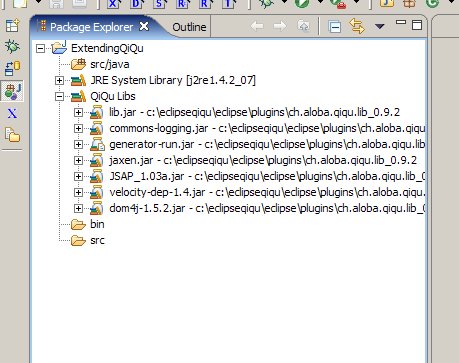 Now, let's move on and ... 2 Write your first QiQu CommandWe will start with a really simple example. Our goal is to write a command with just just one paramter. The content of the paramter has to be displayed in the console output.
So let's create a new java class, call it "Console" and extend it from the class "BaseCommand". Your class should look like the one shown next:
	/*
	 * Created on 07.01.2006
	 */
	package ch.aloba.qiqu.extend;

	import ch.aloba.qiqu.script.base.BaseCommand;

	/**
	 * A simple command that writes to the output.
	 *
	 * @author Hansjoerg
	 */
	public class Console extends BaseCommand
	{
	}
Now we have to implement some required methods. Let's have a look at each one of them. 2.1 getCommandNameGetCommandName defines the Name of the command. We would like our
command to be known as "Console", so that is the string, this method
should return (or alternatively 2.2 getDescriptionThis method returns a short description of the command. It is used to create the documentation and this is as well the text, which is displayed as tooltip in the editor. 2.3 getCommandGroupWhen creating the documentation, commands with the same groupname are - how else should it be - grouped together. This information is used for nothing else. Therefore let's add the following lines to our class:
	/**
	 * @see ch.aloba.qiqu.script.base.BaseCommand#getCommandName()
	 */
	public String getCommandName()
	{
		return "Console";
	}

	/**
	 * @see ch.aloba.qiqu.script.base.BaseCommand#getDescription()
	 */
	public String getDescription()
	{
		return "Writes the content of the attribute 'output' to the console.";
	}

	/**
	 * @see ch.aloba.qiqu.script.base.BaseCommand#getCommandGroup()
	 */
	public String getCommandGroup()
	{
		return "Logging";
	}
2.4 isUsingSubCommandThis method tells the QiQu-System, if this command could have nested commands. Typical examples of such commands are the loop-commands "For" and "While" or the select-command "If". Our simple command "Console" won't have any subcommands, so this method will return false. 2.5 setParametersIn the Method setParameters, we must fulfill two chores. The first is to instance all possible parameters of the command and the second is to define all valid combinations of parameters. In order to instance an parameter, we have to know the type it
should have. The "output" parameter has the type The "BaseCommand" implements factory methods for all possible types. Each of these factory methods takes to input parameters. The first one is the name and the second is a description of the parameter. Again, this description is used to create the documentation and to define the tooltip text in the editor. In order to have an instance of the parameter, we create an appropriate member variable in the class. Additionally, we must define the possible combinations of parameters.
This is also done by calling the appropriate methods from the superclass:
	private CmdParamText m_outputParam = null;

	/**
	 * @see ch.aloba.qiqu.script.base.BaseCommand#setParameters()
	 */
	protected void setParameters()
	{
		m_outputParam = addTextParameter("output", "defines the text which will be written in the console");
		addParameterCombination(m_outputParam);
	}
If there were other possible parameter combinations, we could add them calling
2.6 doItEverything is now ready to implement the real logic of our command:
	/**
	 * @see ch.aloba.qiqu.script.base.IBaseCommand#doIt()
	 */
	public int doIt() throws CommandException
	{
		System.out.println(m_outputParam.getValue());
		return IBaseCommand.COMMAND_RETURN_TYPE_NO_LOOP;
	}
Calling Since this command isn't a loop command, the Congratulations, you've just extended QiQu and wrote your first QiQu-Command. Now, let me explain how you can... 3 Test and Debug an user defined CommandIn order to test an debug our command, we need a couple of thing to do:
3.1 Writing a QiQu-library descriptor fileThe QiQu-library descriptor file has to be called "qiqu.library.xml". It must be in the jar containing the commands. It does not have to be in a special directory. Our QiQu-library descriptor file looks as follows: <QiQuLib> <command fqn="ch.aloba.qiqu.extend.Console"/> </QiQuLib> Let us put the file directly into the root of our source: 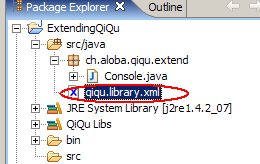 3.2 Write a QiQu-script that uses the commandOur command does not need anything special, so our script just needs one line: <QiQuScript> <Console output="a text"/> </QiQuScript> Let's call the file "testConsoleCommand.qiq" and add it to the "script" folder of our project. Since the QiQu-script editor doesn't know our command yet, it will display an appropriate marker. I show you in a moment, how you can register the command for the editor as well. For now, ignore this. 3.3 Write the testclassAs mentioned, we have to register our library and execute the QiQu-script in the test class. All that is pretty easy and can be done with just three lines. So let us create the following class:
	package ch.aloba.qiqu.extend;

	import ch.aloba.qiqu.librarydata.LibraryManager;
	import ch.aloba.qiqu.script.run.QiQuScriptRun;

	public class TestConsoleCommand
	{
		public static void main(String[] args) throws Exception
		{
			String[] programargs = new String[] {"-s", "script/testConsoleCommand.qiq"};
			QiQuScriptRun runner = new QiQuScriptRun();
			LibraryManager.getInstance().loadLibraryInClasspath("src/java/qiqu.library.xml");
			runner.runScript(programargs);
		}
	}
I've put the class under a new source-folder called "src/javatest" in order to separate the test classes from the ordinary code. 3.4 Let it Run ...Now go and run the testclass. Somewhere in the output, the defined text in the parameter "output" will appear. Since we are writing directly to the console output, we can't tell exactly where it will appear. I think I don't have to tell you, that by enabling a
breakpoint inside the 4 Making the new command known to the QiQu-script editorWhen we wrote our simple testscript, we noticed the QiQu-script editor is not aware of our new command. This means we don't have any code-assist or tooltips for our command and parameter, and there is also an error marker displayed. Two steps are necessary to register our command in the QiQu-script editor:
4.1 Packing the command and the QiQu-library descriptor into a single jar-fileWe will do that with an simple ant script that jars the classes-directory into a jar-file.
	<project name="BuildDemoLib" default="buildlib" basedir=".">
		<property name="dist" location="dist" />
		<property name="classes" location="bin/classes" />
		<property name="filename" value="firstqiqulib.jar" />

		<target name="buildlib">
			<!-- Create the distribution directory -->
			<mkdir dir="${dist}" />

			<!-- Put everything in ${classes} into the jar file -->
			<jar jarfile="${dist}/${filename}" basedir="${classes}" />
		</target>
	</project>
The library jar will be created in the "dist" directory. Now let's ... 4.2 Register the library-jar to the QiQu-script editorThis can be done under the Eclipse-Preferences. Open them, select open the "QiQu"-tree and select runtime. You will see the following dialog: 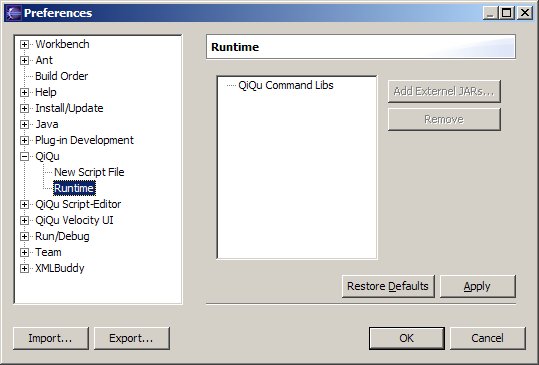 In the "Runtime" dialog, select "QiQu Command Libs" and press the "Add External JARs..." button. Select the library file and press close the "Preferences" dialog by pressing the "OK" button. Open the test-script in the "script" directory, make a small change and watch the error marker disappear. Moving the mouse cursor over the command tag will now show the description of the command. 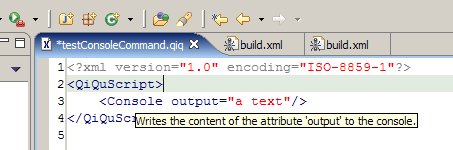 Since the library is now registered inside the QiQu-system, you can launch the script directly: Open the context menu of the file in the navigator or package explorer and select "Run QiQu Script" under the menu group "QiQu". 5 Types of Command ParameterAs mentionied earlier in the tutorial, there are several different types which can be assigned to a command parameter. Each type has a special behaviour and for each type exists an appropriate class which represents the type. The BaseCommand class provides an appropriate factory method for each parameter type. The different parameter types are described in the QiQu Commands Overview, and the following table gives an overview of the explicit parameter type classes and their factory method.
Consult the javadoc of the parameter type classes to find out the methods provided. Also have a look at the core commands in order to see how the parameter type classes are used. 6 Write your first QiQu-FunctionInside a valueexpression parameter of QiQu-Commands, QiQu-Functions can be used. A QiQu-Function is a string manipulating action, which can take any number of parameters and which always returns a string. A userdefined QiQu-Function has to be derived from the class BaseFunction. Again, we will make a simple example. Let's create a "Greeting"-function. The function will take two parameters. The first parameter defines the sex of a person ('m' or 'f') and the second parameter will contain the name of the person. Dependending on the sex of the person, the function will create the string "Hello Mr. name" or "Hello Ms. name". The first step is to create a new java class, which we call "Greeting" and which is derived from the class "BaseFunction". Your class should look like the one shown next:
	/*
	 * Created on 20.01.2006
	 */
	package ch.aloba.qiqu.extend;

	import ch.aloba.qiqu.script.base.BaseFunction;

	/**
	 * A simple QiQu-Function.
	 *
	 * @author Hansjoerg
	 * @version $Revision: 1.1 $
	 */
	public class Greeting extends BaseFunction
	{
	}
Now, we have to implement the required methods. The methods "getName", "getDescription" and "getFunctionGroup" are similar to the ones needed for a command. Therefore, we are going to add the following lines:
    /**
     * @see ch.aloba.qiqu.script.base.BaseFunction#getFunctionName()
     */
    public String getFunctionName()
    {
        return "greeting";
    }

    /**
     * @see ch.aloba.qiqu.script.base.BaseFunction#getFunctionGroup()
     */
    public String getFunctionGroup()
    {
        return "text";
    }

    /**
     * @see ch.aloba.qiqu.script.base.BaseFunction#getDescription()
     */
    public String getDescription()
    {
        return "Creates a greeting string depending on the sex and name of a person.";
    }
Let's examine the rest of the needed methods in detail: 6.1 getReturnTypeAs mentioned, every QiQu-Function returns a String. However, QiQu-knows boolean function, which do return either the string "true" or "false". Boolean QiQu-Function should therefore return in this method the constant IBaseFuntion.TYPE_BOOLEAN. All other have to return IBaseFuntion.TYPE_TEXT. 6.2 getNumberOfParametersThis defines how many parameter the function has. Our "greeting"-function takes two parameters, therfore this method will return 2. 6.3 isLastParameterMultipleThis method returns true, if the last parameter can be repeated any number of times. Typical examples are the core boolean function like "and" and "or". They need at least two parameters, however, there can be any number of parameters. Therefore, this functions have to return true in this method, whereas our "greeting" method will return false. 6.4 setParametersInside this method, you have to call for every parameter the method "addParameter". The first parameter of this function is the index of the parameter as string, the second is the description of the parameter. Implementing the above mentioned methods will add the follwing code to our class.
    /**
     * @see ch.aloba.qiqu.script.base.BaseFunction#getReturnType()
     */
    public int getReturnType()
    {
        return IBaseFunction.TYPE_TEXT;
    }

    /**
     * @see ch.aloba.qiqu.script.base.BaseFunction#getNumberOfParameters()
     */
    public int getNumberOfParameters()
    {
        return 2;
    }

    /**
     * @see ch.aloba.qiqu.script.base.BaseFunction#isLastParameterMultiple()
     */
    public boolean isLastParameterMultiple()
    {
        return false;
    }

    /**
     * @see ch.aloba.qiqu.script.base.BaseFunction#setParameters()
     */
    protected void setParameters()
    {
        addParameter("1", "The sex of th person, either 'm' or 'f'");
        addParameter("2", "The name of the person.");
    }
6.5 evaluateFunctionThe last method to be implemented is "evaluateFunction". This Method will contain the logic of our function. The method receives 2 parameters. The first one is a String[] (params) with the evaluated values of the
QiQu-Function. The second is an Expression[] (expressions) with the Abstract-Syntax-Trees of the parametes.
Calling the getValue-method of an Expression will return the evaluated value.Therfore,
    /**
     * @see ch.aloba.qiqu.script.base.BaseFunction#evaluateFunction(java.lang.String[], ch.aloba.qiqu.parser.model.Expression[])
     */
    public String evaluateFunction(String[] params, Expression[] expressions) throws Exception
    {
        StringBuffer greetStr = new StringBuffer("Hello ");
        if (params[0].equals("m"))
        {
            greetStr.append("Mr.");
        }
        else if (params[0].equals("f"))
        {
            greetStr.append("Ms.");
        }
        greetStr.append(" ").append(params[1]);
        return greetStr.toString();
    }
7 Test and debug your QiQu-FunctionIn order to register the function inside the QiQu-System, we need to add an appropriate entry in the QiQu-library descriptor: <QiQuLib> <function fqn="ch.aloba.qiqu.extend.Console"/> </QiQuLib> Now let's add the following line to our testscript:
<EchoText InfoText="greeting('m','Sears')"/>
Now launch the testclass and in the console output, the entry [INFO] EchoText - Hello Mr. Searswill appear. In order to make the function known to the editor, you have to create a new jar, and register it freshly in the preferences of QiQu. 8 Adding additional libraries to the classpathWhen you develop additional commands and functions, it can be necessary to use additional libraries. If you launch a qiquscript from the command line, you simple need to add the additional libraries to your classpath. When you run your script inside eclipse, you need to add the additional libraries in the classpath register of your launch configuration:  A default launch configuration is created the first time, you launch your script with the Run or Debug action from the contextmenu. It's named "QiQu [projectname] [filename]". You can select your additional libraries in this configuration. The next time you launch the script by selecting Run or Debug from the context menu, the additiona libraries will be loaded. |