| <!--QiQu--> |

|
|
|
Home
Introduction Documentation QiQu Language QiQu Tutorials QiQu Tutorial Extending QiQu Property Dialog Performance QiQu Samples Developer's Corner Downloads Screenshots Contact Sponsoring |
Improving performance
Download the tutorial project here
1 The problem with performanceHaving a well performing generator is critical when following an MDSD or MDA driven approach despite the fact that a lot of people don't agree with that. Their argument is that a generator will be running in a build process. However, the opposite is the true. A developer, who changes a model wants to be able to check this change immediately. He doesn't want to wait until the next day, when a new daily build is available. Therefore, the generator will be running inside his development environment. QiQu is based on XML transformation. Therefore, QiQu scripts will contain
a lot of code, where an XML-element in an XML-document is selected by its attribute values.
For instance, in XMI documents, all different elements are linked together over ids. Every
element in the XMI document has an unique attribute "xmi.id". If an element
needs to reference another one, it has an appropriate "xmi.idref" attribute.
That's the reason you will often need to write xpath expressions in
"For" and "SelectFirst" commands that look somekind like this In QiQu, we are using Dom4J together with jaxen. Unfortunately, an xpath expression like mentioned before does not perform well for large xml documents. As a matter of fact, if the size of a document doubles, the needed time to execute the same xpath is likely to be four times bigger than before. So, let me show you, how you can measure and improve the execution time. 2 Creating the testdata and the testscriptIn order to demonstrate how the performance can be influenced, we need some data to test the performance. This is done with the script "createtestdata.qiq" that is contained in the tutorial project. <QiQuScript> <CreateDoc NewDocRef="$testdataDoc"/> <CreateEle NodeRef="$testdataDoc" EleName="'Testdata'" NewEleRef="$testdata"/> <CreateEle NodeRef="$testdata" EleName="'TypeAList'" NewEleRef="$typealist"/> <CreateEle NodeRef="$testdata" EleName="'TypeBList'" NewEleRef="$typeblist"/> <CreateEle NodeRef="$testdata" EleName="'TypeCList'" NewEleRef="$typeclist"/> <Set Ref="counter" Value="'0'"/> <While Condition="isSmallerThan(counter , NumberOfElements)"> <CreateEle NodeRef="$typealist" EleName="'TypeA'" NewEleRef="$newTypeA"/> <Set Ref="$newTypeA.id" Value="'A' + counter"/> <Set Ref="$newTypeA.counter" Value="counter"/> <Set Ref="$newTypeA.text" Value="'A text ' + counter"/> <CreateEle NodeRef="$typeblist" EleName="'TypeB'" NewEleRef="$newTypeB"/> <Set Ref="$newTypeB.id" Value="'B' + counter"/> <Set Ref="$newTypeB.counter" Value="counter"/> <Set Ref="$newTypeB.text" Value="'B text ' + counter"/> <CreateEle NodeRef="$typeclist" EleName="'TypeC'" NewEleRef="$newTypeC"/> <Set Ref="$newTypeC.id" Value="'C' + counter"/> <Set Ref="$newTypeC.counter" Value="counter"/> <Set Ref="$newTypeC.text" Value="'C text ' + counter"/> <Set Ref="counter" Value="addition(counter , '1')"/> </While> <SaveDoc FileName="'data/testdata.xml'" DocRef="$testdataDoc"/> </QiQuScript> The script creates a document with the structure <Testdata> <TypeAList> <TypeA id="A1" counter="1" text=".."/> <TypeA id="A2" counter="2" text=".."/> ... </TypeAList> <TypeBList> <TypeB id="B1" counter="1" text=".."/> <TypeB id="B2" counter="2" text=".."/> ... </TypeBList> <TypeCList> <TypeC id="C1" counter="1" text=".."/> <TypeC id="C2" counter="2" text=".."/> ... </TypeCList> </Testdata> The number of created elements under each list is defined by the property "NumberOfElements". Next, we need a test algorithm. The following one will do: <LoadDoc FileName="'data/testdata.xml'" NewDocRef="$testdata"/> <For NodeRef="$testdata" XPath="//TypeA" IteratorEleRef="$typea"> <SelectFirst NodeRef="$testdata" XPath="//TypeB[@counter=#$typea.counter#]" SelectedEleRef="$selectedB"/> <SelectFirst NodeRef="$testdata" XPath="//TypeC[@counter=#$typea.counter#]" SelectedEleRef="$selectedC"/> </For> The alogrithm iterates over all TypA elements and selectes the element with the same content in the attribute "counter" in the lists B and C. With the qiqu commands "Profile" and "ProfileReport" we can measure the time that is needed to execute the algorithm. So let's surround our test algorithm with the apropriate code: <QiQuScript> <!-- create the testdata by calling createtestdata.qiq script --> <Set Ref="NumberOfElements" Value="'1000'"/> <LoadDoc FileName="'script/createtestdata.qiq'" NewDocRef="$createDataScript"/> <RunQiQuScript NodeRef="$createDataScript"/> <LoadDoc FileName="'data/testdata.xml'" NewDocRef="$testdata"/> <!-- ************************** No Optimizations ******************************* --> <Profile Name="'5 NoOptimizations'"/> <EchoText InfoText="'No Optimizations'"/> <For NodeRef="$testdata" XPath="//TypeA" IteratorEleRef="$typea"> <SelectFirst NodeRef="$testdata" XPath="//TypeB[@counter=#$typea.counter#]" SelectedEleRef="$selectedB"/> <SelectFirst NodeRef="$testdata" XPath="//TypeC[@counter=#$typea.counter#]" SelectedEleRef="$selectedC"/> </For> <ProfileReport FileName="'profileReport'"/> </QiQuScript> 2.1 The commands Profile and ProfileReportAs mentioned, by using the commands "Profile" and "ProfileReport" it is possible to measure the execution time of single parts in a qiqu script. As soon as the QiQu engine finds a "Profile" command, it starts a timer that is stopped as soon as another "Profile" command or the "ProfileOutput" command is executed. The results are written in a semicolon separeted file, which can be defined in the "ProfileOutput" command. The file contains a line for every defined measure point (defined by the command "Profile"). The first column is the name of the measure point, the second is the number of times this point was hit. The third column shows the average time per run and the last column shows the total time that was accounted to this measure point. 3 Improving the performanceThere are a couple of ways to improve the perfomance. So let's examine those. I will show an appropriate implementation and I will also give you some hints in which situation they can be used. 3.1 Using relativ xpath expressionsThe xpath expression performs better the more precisly we are able to define the xpath. Improving our example algorithm with this strategy, we do not use the general xpath expression like '//TypeA', instead we will use write an expression like './TypeAList/TypeA'. However, this approach is not always possible. If we consider, for instance, an XMI-document that has with a nested package structure, we do not know the path to the Class-Element. In those cases it is necessary to use '//Class[@xmi.id=value]. <!-- ************************** Relativ ******************************* --> <Profile Name="'4 Relativ selected'"/> <EchoText InfoText="'relativ selected'"/> <For NodeRef="$testdata" XPath="./Testdata/TypeAList/TypeA" IteratorEleRef="$typea"> <SelectFirst NodeRef="$testdata" XPath="./Testdata/TypeBList/TypeB[@counter=#$typea.counter#]" SelectedEleRef="$selectedB"/> <SelectFirst NodeRef="$testdata" XPath="./Testdata/TypeCList/TypeC[@counter=#$typea.counter#]" SelectedEleRef="$selectedC"/> </For> Note: since '$testdata' is a document and not the root node of the document, the root node
has be containend in the xpath-expression: 3.2 Splitting a large documentSometimes it is possible to split a large document into separate documents. Following this approach, we can split our testdata document into 3 independent documents. <!-- ************************** Split ******************************* --> <Profile Name="'3 Splitted input'"/> <EchoText InfoText="'Splitted input'"/> <SelectFirst NodeRef="$testdata" XPath="//TypeAList" SelectedEleRef="$typealist"/> <SelectFirst NodeRef="$testdata" XPath="//TypeBList" SelectedEleRef="$typeblist"/> <SelectFirst NodeRef="$testdata" XPath="//TypeCList" SelectedEleRef="$typeclist"/> <CreateDoc EleRef="$typealist" NewDocRef="$typeadoc"/> <CreateDoc EleRef="$typeblist" NewDocRef="$typebdoc"/> <CreateDoc EleRef="$typeclist" NewDocRef="$typecdoc"/> <For NodeRef="$typeadoc" XPath="//TypeA" IteratorEleRef="$typea"> <SelectFirst NodeRef="$typebdoc" XPath="//TypeB[@counter=#$typea.counter#]" SelectedEleRef="$selectedB"/> <SelectFirst NodeRef="$typecdoc" XPath="//TypeC[@counter=#$typea.counter#]" SelectedEleRef="$selectedC"/> </For> 3.3 Combining using a relativ expression and splitting of documentsI included the this algorithm in the tutorial project as well. However, the performance ist pretty much the same as if just a relativ xpath expression is used. Hence there is no appropriate situation, when this approach should be used. <!-- ************************** Split and relativ ******************************* --> <Profile Name="'2 Split and relativ'"/> <EchoText InfoText="'Split and relativ'"/> <SelectFirst NodeRef="$testdata" XPath="//TypeAList" SelectedEleRef="$typealist"/> <SelectFirst NodeRef="$testdata" XPath="//TypeBList" SelectedEleRef="$typeblist"/> <SelectFirst NodeRef="$testdata" XPath="//TypeCList" SelectedEleRef="$typeclist"/> <CreateDoc EleRef="$typealist" NewDocRef="$typeadoc"/> <CreateDoc EleRef="$typeblist" NewDocRef="$typebdoc"/> <CreateDoc EleRef="$typeclist" NewDocRef="$typecdoc"/> <For NodeRef="$typeadoc" XPath="./TypeAList/TypeA" IteratorEleRef="$typea"> <SelectFirst NodeRef="$typebdoc" XPath="./TypeBList/TypeB[@counter=#$typea.counter#]" SelectedEleRef="$selectedB"/> <SelectFirst NodeRef="$typecdoc" XPath="./TypeCList/TypeC[@counter=#$typea.counter#]" SelectedEleRef="$selectedC"/> </For> 3.4 Using the qiqu index commandsAs I wrote my first generator with QiQu, performance issues where raised shortly after I distributed my generator to developers. They had a model with probably 300 classes and the execution time was over 20 minutes. To make things worse, the model didn't include half of the classes that would be needed in the model. By splitting the documents into parts, I was able to decrease the execution time under 10 minutes. However, by knowing that the model size would still increase significantly, I had to find another solution. As I wrote in the introduction to this tutorial, the performance bottlnecks were caused by xpath expressions based on an attribute value. Simply selecting all XML-elements with a specific attribute does perform very well. However, as soon as a check for a specific attribute value was added ... The solution was to write a specific "Index" command, which indexed all XML-elements of
an XML-document based on the value of a specific attribute. So, if there is an xpath expression
in the form The "Index"-command has a parameter "AttrNames", which defines comma separated list of attributes. The "Index"-command will create an index for every attribute in this list. If a document or a node is indexed, and a new element is added, the new element will not be included in the index. Therefore, if a new element was added, it is necessary to clear the existing index on the node and to call the "Index"-command again. Using relativ xpaths on an indexed document takes a lot longer, since the index is
only used for xpaths in the form of <!-- ************************** Index ******************************* --> <Profile Name="'1 Index'"/> <EchoText InfoText="'Index'"/> <Index NodeRef="$testdata" AttrNames="'counter'"/> <For NodeRef="$testdata" XPath="//TypeA" IteratorEleRef="$typea"> <SelectFirst NodeRef="$testdata" XPath="//TypeB[@counter=#$typea.counter#]" SelectedEleRef="$selectedB"/> <SelectFirst NodeRef="$testdata" XPath="//TypeC[@counter=#$typea.counter#]" SelectedEleRef="$selectedC"/> </For> <ClearIndex NodeRef="$testdata"/> 4 Measurement resultsThe following table and diagram contain the measurement results.
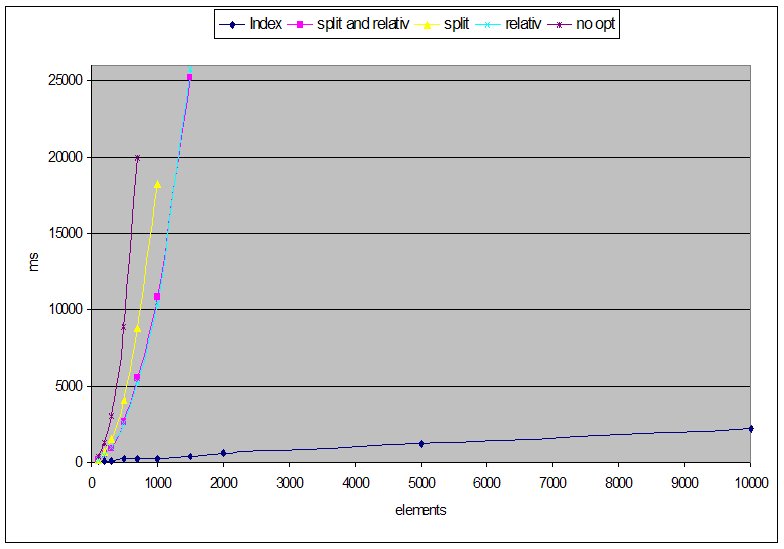 5 ConclusionThe only approach that scales, is using indexes. All others will explode with a raising number of elements. Therefore, in order to improve the performance, consider the following hints:
|