| <!--QiQu--> |

|
|
|
Home
Introduction Documentation QiQu Language QiQu Tutorials QiQu Tutorial Extending QiQu Property Dialog Performance QiQu Samples Developer's Corner Downloads Screenshots Contact Sponsoring |
The QiQu Tutorial 1 Installing The QiQu-Plugin For Eclipse1.1 PreconditionsTo be able to work through the examples in this tutorial (this is to create and run QiQu-Scripts with the QiQu-Plugin for Eclipse) you need to have the following installed:
Please note: If you only want to run QiQu-Scripts, you only need:
Also you needn't to write your QiQu-Scripts with the QiQu-Plugin/QiQu Script-Editor - any texteditor would do perfectly well... but without any assistance of course 1.2 Installing The QiQu-Plugin For Eclipse Using The Zip-FileYou can download the zip-file from here, save it to disk and unzip it into the root-folder of eclipse. 1.3 Installing The QiQu-Plugin For Eclipse Using The Update-SiteYou can also download (and later update you installation) by using the Eclipse update feature.
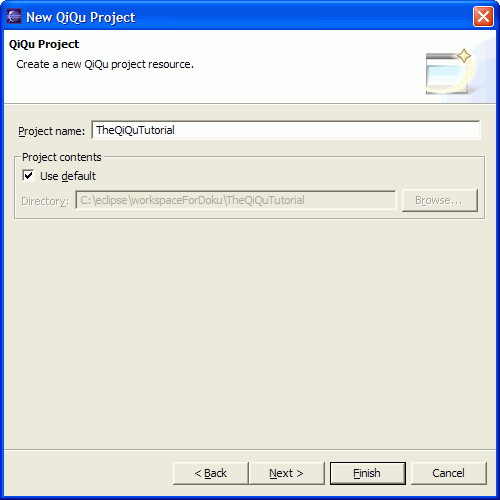
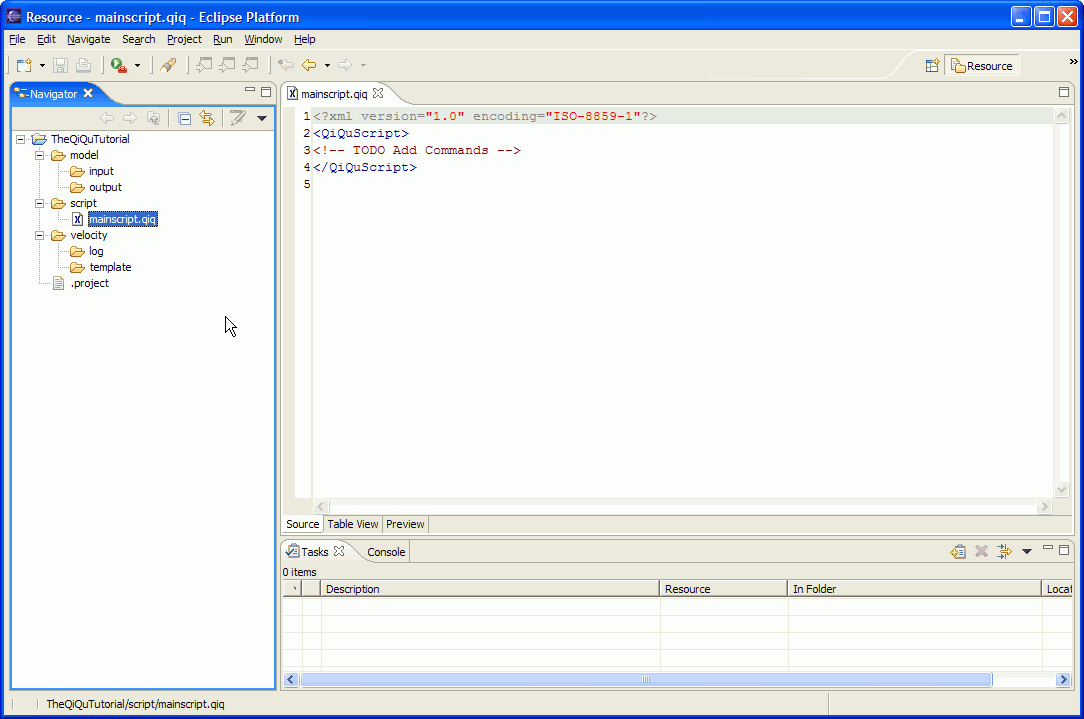
2 Create A New QiQu-ProjectTo create a new QiQu-Project, select File >> New >> Project... in the Eclipse menu.
In the list of wizards select QiQu and then "New QiQu Project", then click "Next >".
Enter the name of your project and its location, click "Next >".
If you tick the checkbox "Use VeloCity template", the
wizard will create a (additional) folder named "velocity"
that's what we want...
If you tick the checkbox "Create a new file mainscript.qiq in
Folder scripts" an empty QiQu-Script file named
"mainscript.qiq" would be created in the folder
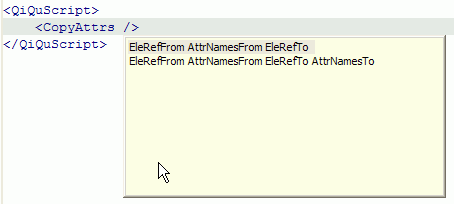
"scripts" - we don't want to do this for the moment... Please note: You do not have to create a QiQu-Project to be able to create and/or run QiQu-Scripts (you can create and run them also in other project-types - i.e. Java-Projects), nor is the folder-structure created by the wizard mandatory - in our examples, though, the default folder-structure is used. 3 Create A New QiQu-ScriptTo create a new QiQu-Script, select File >> New >> Other... in the Eclipse menu. In the lost of wizards select QiQu and then "New QiQu Script File", then click "Next". Enter the location and the name of the file ('scripts/script01.qiq') and click "Finish". Please note: For the QiQu Eclipse-Plugin being able to recognize your file as QiQu-Script and provide the respective features (i.e. to provide additional action-entries in the popup menu for the file, opening the correct editor etc.) your file must have the extension ".qiq"! 4 The QiQu Script-EditorBefore we start writing our first QiQu-Script let's have a look at the Editor that will support your task. 4.1 Code-Completion and HelpEntering a "<" within your script will automatically open a code-completion popup containing all the available QiQu-Commands.
Select a QiQu-Command in the list an press "Enter". The selected QiQu-Command is added to your script. Now "Ctrl + Space" again.
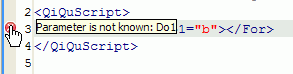
Another code completion popup is opened containing all possible parameter combinations for this command. Select a combination from the list and press "Enter" - the selected parameter-combination is added to your script. Now move your mouse-pointer to the name of the command in your script and wait a second - a tool tip containing more information about the command is displayed. You can check this behaviour also for command parameters and functions. You can press "Ctrl + Space" anywhere within your script and you will get code-completion assistance available for the actual area/part - just try it out. The QiQu-Editor also can show you problems in the code of your QiQu-Script. At the left side of the Edtior-Window, you can sometimes see different markers/icons indicating a problem.
Just move your mouse-pointer over the icon and wait a second - the respective message will be displayed in a tool tip.
4.2 Editor-SettingsNormally, all files with the extension ".qiq" should open automatically in the QiQu Script-Editor. If not, probably the settings for the file extension is missing.
4.3 Debugger IntegrationDebugging of QiQu scripts is completely integrated in the Eclipse Debugger. You will learn more about debugging of QiQu scripts, after you have written your first script. For now, just feel comfortable by knowing that you will be able to debug your scripts.
5 My First QiQu-ScriptLet's have a first look at the QiQu-Script-Language. We create a script which only prints out the famous text 'Hello World' to the console. Create a new QiQu-Script named "script01.qiq" in the folder "script" - the QiQu Script-Editor should open:
Write the following code: <?xml version="1.0" encoding="ISO-8859-1"?> <QiQuScript> <EchoText InfoText="'Hello World'"/> </QiQuScript> As you can see, the QiQu-Script-Language is written in XML. Each QiQu-Command is defined as XML element, it's parameters are defined as attributes. In our example you see the QiQu-Command <EchoText> with the parameter "InfoText" containing the value 'Hello World'. This command will print out the Text "Hello World" to the console and/or into a log file (make sure the text is enclosed by "'"!! (correct format: InfoText="'Hello World'") Please note: The root-element of each QiQu-Script mustbe the QiQu-Command <QiQuScript> - as shown in the example. Now save your first QiQu-Script. To run your script, select the file in the Navigator - open the context-menu (2 nd mouse-button) and select Run As->QiQu Script
You can also select the Run As entry from context-menu of the editor itself. Now watch the output in the console-view. Congratulations! You just finished your first QiQu-Task! Well this was quite easy, wasn't it? But now let's go to a more complex sample... 6 My First Transformation With QiQuNow we want to perform the first real transformation. Inside this chapert, we will also see what the debugger can do for us. 6.1 The InputAs input we have to create the following XML file "inputmodel01.xml" in the folder "model/input" - use File >> New >> File in the Eclipse menu (don't worry, a XMI example will follow later):
<beanlist>
   <bean name= " ABean" package="ch.aloba.qiqu.helloWorld.beans">
      <propertylist>
         <property name="firstProperty" type="java.lang.String"/>
         <property name="secondProperty" type="java.lang.String"/>
      </propertylist>
   </bean>
   <bean name="AnotherBean" package="ch.aloba.qiqu.helloWorld.beans">
      <propertylist>
         <property name="myProperty" type="java.lang.String"/>
         <property name="yourProperty" type="java.lang.String"/>
      </propertylist>
   </bean>
</beanlist>
Of course - if you wish you can add more <bean> and <property> elements. 6.2 The Wanted OutputWe want to transform each <bean> element into a Java bean. The respective source code for each Java class should look as follows:
/*
 * Created by QiQu Bean Generator
 * Date 11.01.06
 */
package ch.aloba.qiqu.helloWorld.beans

/**
 * Bean Class ABean.
 */
public class ABean
{
  /* m_firstProperty */
  private java.lang.String
m_firstProperty = null;

  /* m_secondProperty */
  private java.lang.String
m_secondProperty = null;

  /**
   * Default Constructor.
   */
  public ABean()
  {
  }
  /**
   * @return m_firstProperty
   */
  public java.lang.String
getFirstProperty()
  {
    return m_firstProperty;
  }

  /**
   * @param firstProperty
   */
  public void setFirstProperty(java.lang.String firstProperty)
  {
    m_firstProperty = firstProperty;
  }

  /**
   * @return m_secondProperty
   */
  public java.lang.StringgetSecondProperty()
  {
    return m_secondProperty;
  }

  /**
   * @param secondProperty
   */
  public void setSecondProperty(java.lang.String secondProperty)
  {
    m_secondProperty = secondProperty;
  }
}
All the variable parts in the code are marked italic bold. If you compare the wanted output with the input, you find out that most of the information is already in the input model. What we have to do is to add the creation date and the names for the getter and setter methods (first letter in upper-case). 6.3 The QiQu-Script - Performing The TransformationSo let's write the according QiQu-Script: Create a new QiQu-Script named "script02.qiq". The main task of a QiQu-Script is to transform the input-model (XML) into an output-model (XML) which then can be used for further tasks. To perform this transformation there are basically two possible ways:
If the structure of input- and output-model is very similar, as in our example, the second way is easier. In our example we have to perform the following steps:
Fill the following code into your "script02.qiq":
<?xml version="1.0" encoding="ISO-8859-1"?>

<QiQuScript>

   <LoadDoc FileName="'model/input/inputmodel01.xml'" NewDocRef="$inModel"/>

    <For NodeRef="$inModel" XPath="//bean" IteratorEleRef="$lbean">
      <Set Ref="$lbean.date" Value="dateString('dd.MM.yy')"/>
    </For>

    <For NodeRef="$inModel" XPath="//property" IteratorEleRef="$lprop">
       <Set Ref="$lprop.methName" Value="toFirstUpperCase($lprop.name)"/>
    </For>

    <SaveDoc FileName="'model/output/outputmodel01.xml'"
       DocRef="$inModel" Encoding="'ISO-8859-1'"/>

</QiQuScript>
Let's have a closer look at the commands we used:
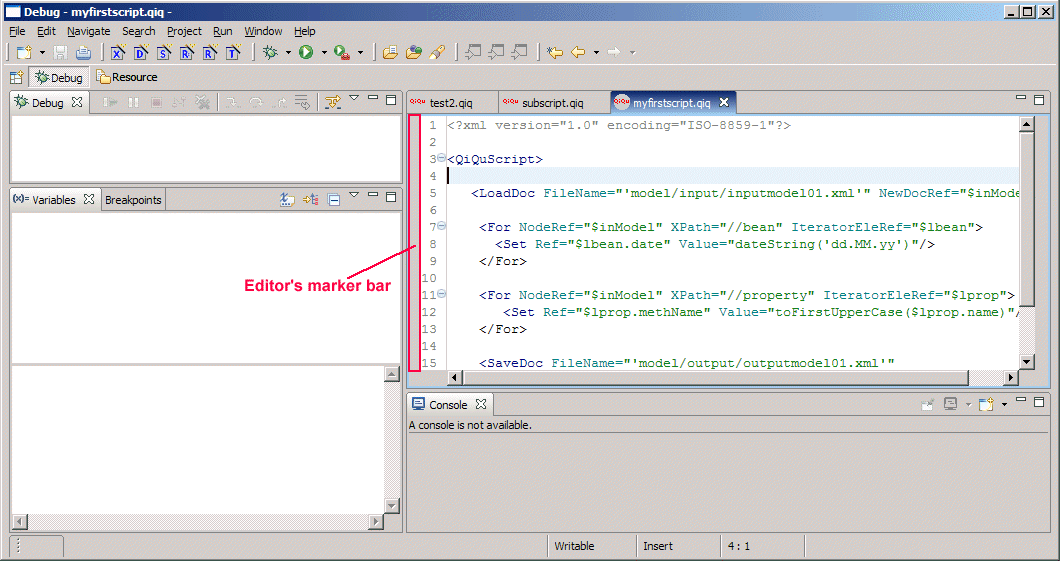
Save your script. To run the script, select Run as->QiQu script from the context-menu of the Navigation view or from the context-menu of the QiQu Script editor itself. Now have a look at the file " outputmodel01.xml" that was created in the folder " model/output". 6.4 Debugging the scriptIn order to debug your script, you have to do two things: activate breakpoints and start the script in debug mode. A breakpoint can be activated either by selecting the "Toggle Breakpoint" entry in the context-menu of the editor's marker bar (on the left side of the editor), by positio the insertion cursorinaline and then press Ctrl+Shift+B or to double-click in the editor's marker bar on the line you want the breakpoint defined.
In order to debug a script, you have to choose Debug as->QiQu Script from the context-menu of the Navigation view or from the context-menu of the QiQu Script editor itself. So, create a breakpoint on the first Set command (line 8), start the script in debug mode and switch to the debug perspecitve. You should be seeing now something like this:
In the Variables view, you'll notice a couple of information. It is actually grouped in five
parts. The first part are the command parameters of the currently active command. In our case,
this is the first Set command which actually has 2 parameters. In the picture above, you can see
that the Value parameter is selected. And as a matter of fact, in the detail part of the
variables few, you see, that the actual expression "dateString('dd.MM.yy')" is evaluated and
displays the current date. You can step through the script by pressing F6 or run to the next breakpoint by F8. Alternatively, you can also use the appropriate Toolbar buttons on the Debug view. 6.5 A Word About QiQu-Command ParametersMaybe a bit early - but let's have a few words about the different types of parameters a QiQu-Command can have. You remember: A QiQu-Command is defined as XML-element and its parameters are defined as XML-attributes. Therefore the correct Syntax for a QiQu-Command parameter is ParameterName="value". The value and its format depends on the type of parameter... There are basically 3 types of parameters: 6.5.1 Parameters Holding A ReferenceReferences are like variables - they are placeholders for some value. There are two types of references:
Samples:
6.5.2 Parameters Holding A ValueexpressionA valueexpression returns plain text, defining a file-name, a value to be set into an attribute etc. To build the valueexpression you can use text, properties QiQu-Functions or values of referenced elements. Samples: For these samples we assume that we have
6.5.3 Parameters Holding A XPath ExpressionA XPath expression is used to navigate in a XML-model (you can compare it with a SQL-statement for a database). It is used to retrieve elements from a XML-model. Inside the XPath expression you can also use QiQu references. QiQu references inside a XPath expression must be enclosed by "#" and if its value shall be used as text it must be enclosed by "'" (single-quotes) as well. Samples: For these samples we assume that we have
6.6 The QiQu-Script - Creating The OutputWell, so far we only have created the new structure of the XML-file. So what we have to to is create the output as described. For the moment we are using only QiQu-Commands to produce the output - if you feel this is a bit clumsy: An example using Velocity will follow... We create a new QiQu-Script "script03.qiq":
<?xml version="1.0" encoding="ISO-8859-1"?>

 <QiQuScript>

   <LoadDoc FileName="'model/input/inputmodel01.xml'" NewDocRef="$inModel"/>

   <For NodeRef="$inModel" XPath="//bean" IteratorEleRef="$lbean">
     <Set Ref="$lbean.date" Value="dateString('dd.MM.yy')"/>
     <For NodeRef="$lbean" XPath="./propertylist/property" IteratorEleRef="$lprop">
       <Set Ref="$lprop.methName" Value="toFirstUpperCase($lprop.name)"/>
     </For>
   </For>

   <For NodeRef="$inModel" XPath="//bean" IteratorEleRef="$lbean">
     <!-- creating the file -->
     <CreateFile NewFileRef="$lfile"/>

     <!-- creating the class header -->
     <PrintToFile FileRef="$lfile" Value="'/*'"/>
     <PrintToFile FileRef="$lfile" Value="'* Created by QiQu Bean Generator'"/>
     <PrintToFile FileRef="$lfile" Value="'* Date ' + $lbean.date"/>
     <PrintToFile FileRef="$lfile" Value="'*/'"/>
     <PrintToFile FileRef="$lfile" Value="'package ' + $lbean.package"/>
     <PrintToFile FileRef="$lfile" Value="''"/>
     <PrintToFile FileRef="$lfile" Value="'/**'"/>
     <PrintToFile FileRef="$lfile" Value="'* Bean Class ' + $lbean.name + '.'"/>
     <PrintToFile FileRef="$lfile" Value="'*/'"/>
     <PrintToFile FileRef="$lfile" Value="'public class ' + $lbean.name"/>
     <PrintToFile FileRef="$lfile" Value="'{'"/>

     <!-- creating the attributes -->
     <For NodeRef="$lbean" XPath="./propertylist/property" IteratorEleRef="$lprop">
        <PrintToFile FileRef="$lfile" Value="''"/>
        <PrintToFile FileRef="$lfile" Value="' /* m_' + $lprop.name + ' */'"/>
        <PrintToFile FileRef="$lfile" Value="' private ' + $lprop.type
                     + ' m_' + $lprop.name + ' = null' + ';'"/>
     </For>

     <!-- creating the constructor -->
     <PrintToFile FileRef="$lfile" Value="''"/>
     <PrintToFile FileRef="$lfile" Value="' /**'"/>
     <PrintToFile FileRef="$lfile" Value="' * Default Constructor.'"/>
     <PrintToFile FileRef="$lfile" Value="' */'"/>
     <PrintToFile FileRef="$lfile" Value="' public ' + $lbean.name + '()'"/>
     <PrintToFile FileRef="$lfile" Value="' {'"/>
     <PrintToFile FileRef="$lfile" Value="' }'"/>

     <!-- creating the getters and setters -->
     <For NodeRef="$lbean" XPath="./propertylist/property" IteratorEleRef="$lprop">
       <!-- the getter method -->
       <PrintToFile FileRef="$lfile" Value="''"/>
       <PrintToFile FileRef="$lfile" Value="' /**'"/>
       <PrintToFile FileRef="$lfile" Value="' * @return m_' + $lprop.name"/>
       <PrintToFile FileRef="$lfile" Value="' */'"/>
       <PrintToFile FileRef="$lfile" Value="' public ' + $lprop.type
                    + ' get' + $lprop.methName + '()'"/>
       <PrintToFile FileRef="$lfile" Value="' {'"/>
       <PrintToFile FileRef="$lfile" Value="' return m_' + $lprop.name + ';'"/>
       <PrintToFile FileRef="$lfile" Value="' }'"/>
       <PrintToFile FileRef="$lfile" Value="''"/>
       <!-- the setter method -->
       <PrintToFile FileRef="$lfile" Value="' /**'"/>
       <PrintToFile FileRef="$lfile" Value="' * @param ' + $lprop.name"/>

       <PrintToFile FileRef="$lfile" Value="' */'"/>
       <PrintToFile FileRef="$lfile" Value="' public void set' + $lprop.methName
                    + '(' + $lprop.type + ' ' + $lprop.name + ')'"/>
       <PrintToFile FileRef="$lfile" Value="' {'"/>
       <PrintToFile FileRef="$lfile" Value="' m_' + $lprop.name
                    + ' = ' + $lprop.name + ';'"/>
       <PrintToFile FileRef="$lfile" Value="' }'"/>
     </For>
     <!-- closing the class -->
     <PrintToFile FileRef="$lfile" Value="''"/>
     <PrintToFile FileRef="$lfile" Value="'}'"/>
     <PrintToFile FileRef="$lfile" Value="''"/>

     <!-- saving the .java file -->
     <SaveFile FileName="'model/output/' + $lbean.name + '.java'" FileRef="$lfile"/>
   </For>
 </QiQuScript>
Let's have a closer look at the first section:
<LoadDoc FileName="'model/input/inputmodel01.xml'" NewDocRef="$inModel"/>
 <For NodeRef="$inModel" XPath="//bean" IteratorEleRef="$lbean">
   <Set Ref="$lbean.date" Value="dateString('dd.MM.yy')"/>
   <For NodeRef="$lbean" XPath="./propertylist/property" IteratorEleRef="$lprop">
          <Set Ref="$lprop.methName" Value="toFirstUpperCase($lprop.name)"/>
   </For>
 </For>
As a matter of fact, we do exactly the same as in "script02.qiq" - just with a bit more "style".
We don't save the output-model to disk this time - it's not necessary. So now let's have a look at the second part of our script: <For NodeRef="$inModel" XPath="//bean" IteratorEleRef="$lbean"> <!-- creating the file --> <CreateFile NewFileRef="$lfile"/> <!-- creating the class header --> <PrintToFile FileRef="$lfile" Value="'/*'"/> <PrintToFile FileRef="$lfile" Value="'* Created by QiQu Bean Generator'"/> <PrintToFile FileRef="$lfile" Value="'* Date ' + $lbean.date"/> <PrintToFile FileRef="$lfile" Value="'*/'"/> <PrintToFile FileRef="$lfile" Value="'package ' + $lbean.package"/> We create the wanted output as described in chapter ?? directly from within our QiQu-Script, without using any other tool - like a template engine.
<!-- saving the .java file -->
<SaveFile FileName="'model/output/' + $lbean.name + '.java'"
FileRef="$lfile"/>
</For>
Save your script, run it and have a look at the generated ".java" files located in the 'model/output' folder (make sure refresh the contents shown in your workspace - select the project, open the context menu and click "Refresh"). 7 Using VelocityInstead of writing the output directly from within a QiQu-Script - as we have in "script03.qiq", you can also use Velocity. QiQu has a tight integration of Velocity and there is also an editor for Velocity templates included in the QiQu-Plugin. You should be aware, though, that using Velocity means that you also need a basic understanding of the Velocity template-/macro language. You find out more about Velocity on http://jakarta.apache.org/velocity. You will find out that Velocity is very powerful. But be careful using all those features - we recommend not to put a lot of logic into the Velocity templates; put the transformation logic in your QiQu-Scripts and use Velocity as a pure template-engine. If you do so, as a nice side-effect, your Velocity templates will be simple, so that they almost look like the output you want to generate. Deciding for or against the use of Velocity is mainly a matter of "gusto" - you can do it either way (you could also use some other template-engine and create a new QiQu-Command to run it). 7.1 XML structure conventionYou have to follow one rule when creating your xml-documents. If you can have several childelements of the same name, they must be grouped under one elementen with the same name and the ending "list" (written with lower case letters). For instance, let's assume, you have a document containing several class elements and every class element itself can have several attribut entries. The correct way to structure your document would be:
<classlist>
<class name="class1">
<attributlist>
<attribut name="attr1ofClass1"/>
<attribut name="attr2ofClass1"/>
</attributlist>
</class>
<class name="class2">
<attributlist>
<attribut name="attr1ofClass2"/>
<attribut name="attr2ofClass2"/>
</attributlist>
</class>
<classlist>
Please note: if you do not follow this rule, the code assist and the preview of the QiQu Velocity-Editor won't work. And hence, the generation at all will fail. 7.2 The QiQu Velocity-EditorTo support you writing Velocity templates, the QiQu Eclipse-Plugin contains a template editor. The QiQu Velocity-Editor is an extension of "Veloedit" ( http://veloedit.sourceforge.net/). The most important extensions are: 7.2.1 Code-Completion based on a given modelYou can identify the model which shall be used as input for the template. Based on this model, the QiQu Velocity-Editor will provide code-completion assistance. To provide the editor a input model perform the following steps:
If you need to provide just one entry to the velocity context, you can directly use the RunVelocity-command. The XML-node that is provided in the parameter "NodeRef" will be available in the velocity template under the name '$model'. However, if it should be necessary to add several xml-elements to the velocity context simply use the VelocityContextPut command. The parameter "ContextName" defines the name under which the entry will be available in the template.
7.2.2 Realtime PreviewIf you have provided an input model, you can perform a realtime preview. And if we say realtime preview, we mean it. As soon as you type, the preview will adapt automatically. Any place in the editor-window open the context menu and select "Preview as Text". A new Text-Editor will open containing the generated output. If you select the entry "Preview type specific" the QiQu Velocity Editor will try to open a type specific editor. The type is evaluated base on the file ending. The naming convention is as follows: "filename.[type].vm". For example, "javaVelocityTemplate.java.vm". When creating a type specific preview, the QiQu Velocity Editor transfers a text-stream to the editor, not a file. Unfortunately, some editors to need a file in order to work.
7.3 My First Velocity TemplateFor our first Velocity template we will use the wanted output we described before as a starting point. Create a new file named template01.vm in the "/velocity/template" folder. Open it and copy the following content in the file: /*
* Created by QiQu Bean Generator
* Date 11.01.06
*/
package ch.aloba.qiqu.helloWorld.beans
/**
* Bean Class ABean.
*/
public class ABean
{
/* m_firstProperty */
private java.lang.String m_firstProperty = null;
/* m_secondProperty */
private java.lang.String m_secondProperty = null;
/**
* Default Constructor.
*/
public ABean()
{
}
/**
* @return m_firstProperty
*/
public java.lang.String getFirstProperty()
{
return m_firstProperty;
}
/**
* @param firstProperty
*/
public void setFirstProperty(java.lang.String firstProperty)
{
m_firstProperty = firstProperty;
}
/**
* @return m_secondProperty
*/
public java.lang.String getSecondProperty()
{
return m_secondProperty;
}
/**
* @param secondProperty
*/
public void setSecondProperty(java.lang.String secondProperty)
{
m_secondProperty = secondProperty;
}
}
Remember - all the parts in bold italic are those we need to be able to fill dynamically.
Please note: With the last steps you just told the Velocity editor which structure will be input for the template - you don't really need to do this to be able to write Velocity templates and to run the from within a QiQu-Script. The only reason to do this is to better profit of the functionalities provided by the QiQu Velocity-Editor. Go back to your "template01.vm" and complete its content as follows: #set($bean=$model)
/*
* Created by QiQu Bean Generator
* Date ${bean.date}
*/
package ${bean.package}
/**
* Bean Class ${bean.name}.
*/
public class ${bean.name}
{
#foreach($property in ${bean.propertylist})
/* m_${property.name} */
private ${property.type} m_${property.name} = null;
#end
/**
* Default Constructor.
*/
public ${bean.name}()
{
}
#foreach($property in ${bean.propertylist})
/**
* @return m_${property.name}
*/
public ${property.type} get${property.methName}()
{
return m_${property.name};
}
/**
* @param ${property.name}
*/
public void set${property.methName}(${property.type} ${property.name})
{
m_${property.name} = ${property.name};
}
#end
}
What have we done? All entries starting with "#" are Velocity commands. All entries starting with "$" are references to the model (that's the model we just provided as context).
7.4 Run Your Template From Within A QiQu-ScriptCreate a new QiQu-Script named "script04.qiq" <?xml version="1.0" encoding="ISO-8859-1"?>
<QiQuScript>
<LoadDoc FileName="'model/input/inputmodel01.xml'" NewDocRef="$inModel"/>
<For NodeRef="$inModel" XPath="//bean" IteratorEleRef="$lbean">
<Set Ref="$lbean.date" Value="dateString('dd.MM.yy')"/>
<For NodeRef="$lbean" XPath="./propertylist/property" IteratorEleRef="$lprop">
<Set Ref="$lprop.methName" Value="toFirstUpperCase($lprop.name)"/>
</For>
</For>
<For NodeRef="$inModel" XPath="//bean" IteratorEleRef="$lbean">
<RunVelocity NodeRef="$lbean" TemplateFileName="'velocity/template/template01.vm'"
OutputFileName="'model/output/velocity/' + $lbean.name +'.java'"/>
</For>
</QiQuScript>
The first part is identical with the one in "script03.qiq" - we perform the model transformation. The only things we need to do now:
Save your script, run it and watch the output generated into the folder "model/output/velocity". If you compare the output created with "script03.qiq" and "script04.qiq" they should be identical. 7.5 Using Protected SectionsAccording to the defined overwrite mode in the RunVelocity command, protected sections will not be overwritten. This is done the following way:
The start of a protected section is identified by the string "QiQuPS Start [name]" and the ending is defined by "QiQuPS End [name]". Every protected section in a file must have a unique name in the file. Protected sections cannot be nested or crossed. Every protected section must be "closed" by an appropriate end tag. If this rules are not followed, an exception will be thrown. The following template shows how protected sections are defined: #set($bean=$model)
/*
* Created by QiQu Bean Generator
* Date ${bean.date}
*/
package ${bean.package}
/**
* Bean Class ${bean.name}.
*/
public class ${bean.name}
{
/**
* Default Constructor.
*/
public ${bean.name}()
{
}
#foreach($property in ${bean.propertylist})
/**
* @return m_${property.name}
*/
public ${property.type} get${property.methName}()
{
$property.type retVal = null;
// QiQuPS Start get${property.methName}
// TODO: implement logic
retVal = ...
// QiQuPS End get${property.methName}
return retVal;
}
/**
* @param ${property.name}
*/
public void set${property.methName}(${property.type} ${property.name})
{
// QiQuPS Start set${property.methName}
// TODO: implement logic
// QiQuPS End set${property.methName}
}
#end
} Despite the fact that there is the possibility to define protected sections, we do not recommend to use it. Generally, mixing generated and hand-written code is a bad idea. First, it often influence users in the way, that they do not use the generator, because the don't have trust that their manual written code won't be touched. Second, there are couple of issues to have such mixed files under source control. 8 Reusing QiQu-Scripts / Chaining QiQu-ScriptsLets have a look again at our "script03.qiq". Besides the fact that maybe the section creating our ".java" files is less "wysiwyg" than the Velocity template we just created (we discussed this issue already) it has another disadvantage: The logic of transforming input-model to output-model and the formatting of the output (the ".java" files) is done in one single script. This is not a good idea - separating these tasks into different scripts is more flexible for the future. With QiQu you have the possibility to reuse QiQu-Scripts and "chain them together". Let's see how this is done. We take our "script03.qiq" as a starting point. Create a new QiQu-Script "script05.qiq" and copy/paste the first part from "script03.qiq": <?xml version="1.0" encoding="ISO-8859-1"?>
<QiQuScript>
<LoadDoc FileName="'model/input/inputmodel01.xml'" NewDocRef="$inModel"/>
<For NodeRef="$inModel" XPath="//bean" IteratorEleRef="$lbean">
<Set Ref="$lbean.date" Value="dateString('dd.MM.yy')"/>
<For NodeRef="$lbean" XPath="./propertylist/property" IteratorEleRef="$lprop">
<Set Ref="$lprop.methName" Value="toFirstUpperCase($lprop.name)"/>
</For>
</For>
</QiQuScript>
As you can see - it contains only the transformation task. Now create another QiQu-Script "script06.qiq" and copy/paste the rest of "script03.qiq": <?xml version="1.0" encoding="ISO-8859-1"?>
<QiQuScript>
<For NodeRef="$inModel" XPath="//bean" IteratorEleRef="$lbean">
   <!-- creating the file -->
   <CreateFile NewFileRef="$lfile"/>
   <!-- creating the class header -->
   <PrintToFile FileRef="$lfile" Value="'/*'"/>
   <PrintToFile FileRef="$lfile" Value="'* Created by QiQu Bean Generator'"/>
   <PrintToFile FileRef="$lfile" Value="'* Date ' + $lbean.date"/>
   <PrintToFile FileRef="$lfile" Value="'*/'"/>
   <PrintToFile FileRef="$lfile" Value="'package ' + $lbean.package"/>
<PrintToFile FileRef="$lfile" Value="''"/>
<PrintToFile FileRef="$lfile" Value="'/**'"/>
<PrintToFile FileRef="$lfile" Value="'* Bean Class ' + $lbean.name + '.'"/>
<PrintToFile FileRef="$lfile" Value="'*/'"/>
<PrintToFile FileRef="$lfile" Value="'public class ' + $lbean.name"/>
<PrintToFile FileRef="$lfile" Value="'{'"/>
<!-- creating the attributes -->
<For NodeRef="$lbean" XPath="./propertylist/property" IteratorEleRef="$lprop">
<PrintToFile FileRef="$lfile" Value="''"/>
<PrintToFile FileRef="$lfile" Value="' /* m_' + $lprop.name + ' */'"/>
<PrintToFile FileRef="$lfile" Value="' private ' + $lprop.type
+ ' m_' + $lprop.name + ' = null' + ';'"/>
</For>
<!-- creating the constructor -->
<PrintToFile FileRef="$lfile" Value="''"/>
<PrintToFile FileRef="$lfile" Value="' /**'"/>
<PrintToFile FileRef="$lfile" Value="' * Default Constructor.'"/>
<PrintToFile FileRef="$lfile" Value="' */'"/>
<PrintToFile FileRef="$lfile" Value="' public ' + $lbean.name + '()'"/>
<PrintToFile FileRef="$lfile" Value="' {'"/>
<PrintToFile FileRef="$lfile" Value="' }'"/>
<!-- creating the getters and setters -->
<For NodeRef="$lbean" XPath="./propertylist/property" IteratorEleRef="$lprop">
<!-- the getter method -->
<PrintToFile FileRef="$lfile" Value="''"/>
<PrintToFile FileRef="$lfile" Value="' /**'"/>
<PrintToFile FileRef="$lfile" Value="' * @return m_' + $lprop.name"/>
<PrintToFile FileRef="$lfile" Value="' */'"/>
<PrintToFile FileRef="$lfile" Value="' public ' + $lprop.type
+ ' get' + $lprop.methName + '()'"/>
<PrintToFile FileRef="$lfile" Value="' {'"/>
<PrintToFile FileRef="$lfile" Value="' return m_' + $lprop.name + ';'"/>
<PrintToFile FileRef="$lfile" Value="' }'"/>
<PrintToFile FileRef="$lfile" Value="''"/>
<!-- the setter method -->
<PrintToFile FileRef="$lfile" Value="' /**'"/>
<PrintToFile FileRef="$lfile" Value="' * @param ' + $lprop.name"/>
<PrintToFile FileRef="$lfile" Value="' */'"/>
<PrintToFile FileRef="$lfile" Value="' public void set' + $lprop.methName
+ '(' + $lprop.type + ' ' + $lprop.name + ')'"/>
<PrintToFile FileRef="$lfile" Value="' {'"/>
<PrintToFile FileRef="$lfile" Value="' m_' + $lprop.name
+ ' = ' + $lprop.name + ';'"/>
<PrintToFile FileRef="$lfile" Value="' }'"/>
</For>
<!-- closing the class -->
<PrintToFile FileRef="$lfile" Value="''"/>
<PrintToFile FileRef="$lfile" Value="'}'"/>
<PrintToFile FileRef="$lfile" Value="''"/>
  <!-- saving the .java file -->
  <SaveFile FileName="'model/output/' + $lbean.name + '.java'"
          FileRef="$lfile"/>
</For>
</QiQuScript>
This script contains only the formatting part. Now we have to "chain" the two scripts together. Create a new QiQu-Script "script07.qiq" as follows: <?xml version="1.0" encoding="ISO-8859-1"?> <QiQuScript> <LoadDoc FileName="'script/script05.qiq'" NewDocRef="$script1"/> <RunQiQuScript NodeRef="$script1"/> <LoadDoc FileName="'script/script06.qiq'" NewDocRef="$script2"/> <RunQiQuScript NodeRef="$script2"/> </QiQuScript> What are we doing here?
Actually from QiQu version 1.0.0, there is no need to call LoadDoc in advance. Simply use RunQiQuSript FileName="'...'" to get the same result. 8.1 Reuse Of ReferencesIf you have a closer look at the last scripts we just created, you might have noticed, that we never saved the outputmodel anywhere. How is that possible? The reason the scripts work correctly is that references live for the entire running-cycle of a script. If you are chaining scripts, the live-cycle of each of them starts when it is executed with the command <RunQiQuScript> and it ends when all the scripts are finished. In our example, the reference $inModel is defined in "script05.qiq" but is still available for "script06.qiq". This feature is often useful, but can also cause you trouble. Remember that behind the reference is a - real - XML-model, which can be quite big and consume a lot of memory. If you are sure you do not need a reference anymore, it might be a good idea to remove it again. You can do this by using the <ClearRef> command. 9 Make Your Scripts More Flexible / The Use Of PropertiesEven though we can reuse our scripts now, if we have a closer look at them - still we can not be fully satisfied. The QiQu-Scripts as well as the Velocity template are still to static and not convenient for multiple/more flexible use i.e:
Let's change that! The magic word is "properties"... Create a new (ordinary) file in the folder "script" named "script08.properties": #the name of the input file Input=model/input/inputmodel01.xml What did we do? We have defined a property named "Input" holding the name of the file containing the input-model. Now make a copy of "script05.qiq", name it "script08.qiq" and change it as follows: <?xml version="1.0" encoding="ISO-8859-1"?>
<QiQuScript>
<LoadDoc FileName="Input" NewDocRef="$inModel"/>
<For NodeRef="$inModel" XPath="//bean" IteratorEleRef="$lbean">
<Set Ref="$lbean.date" Value="dateString('dd.MM.yy')"/>
<For NodeRef="$lbean" XPath="./propertylist/property" IteratorEleRef="$lprop">
<Set Ref="$lprop.methName" Value="toFirstUpperCase($lprop.name)"/>
</For>
</For>
</QiQuScript>
The only thing we changed is the command <LoadDoc> - we changed the parameter "FileName" to just hold the name/reference of the property ("Input") instead of the concrete filename. Now make a copy of "script07.qiq", name it "script09.qiq" and change it as follows: <?xml version="1.0" encoding="ISO-8859-1"?> <QiQuScript> <LoadPropFromFile FileName="'script/script08.properties'"/> <LoadDoc FileName="'script/script08.qiq'" NewDocRef="$script1"/> <RunQiQuScript NodeRef="$script1"/> <LoadDoc FileName="'script/script06.qiq'" NewDocRef="$script2"/> <RunQiQuScript NodeRef="$script2"/> </QiQuScript> What did we do?
The rest of the script remains unchanged...
Save the file and run "script09.qiq". Again - because the live-cycle of references can span multiple scripts, the property named "Input" (which is a reference - see A Word About QiQu-Command Parameters) is still available in "script08.qiq"; and the reference $inModel - defined in "script08.qiq" is still available for "script06.qiq" Please note: it is a pure design question where to load the property-file. You can create one property-file for all of the scripts or for each individually; you can load each property file within the script it belongs to or in the "main" script... It's you who decides! Please note: it is of course also possible to define properties with the help of QiQu-Commands. You could create a QiQu-Script containing only the definitions of your properties. This is done with the <Set>-Command (<Set Ref="Input" Value="'model/input/inputmodel01.xml'"/>). Instead of loading the properties-file with the <LoadPropFromFile>-Command, you would load the script with the <LoadDoc>- and run it with the <RunQiQuScript>-Command... Of course we could add some more properties and also make the formatting script "script06.qiq" more flexible - i.e. to be able to choose the prefix for the instance-variables of the Java classes... maybe you can try it yourself... 10 Adding More Flexibility Using Property-DialogsMaybe you still feel that our solution is not flexible enough - you do not want to change a property-file each time before running your script. Here is the solution: Use property-dialogs. Create a new simple file in the "script" folder and name it "dialog01.xml": <propertydialog title="Small Gui Example">
<widgetlist name="scriptselection">
<widget type="label"
name="Select The Input Model"
propertyname=""
startvalue=""/>
<widget type="file"
name="Inputmodel:"
propertyname="Input"
startvalue=""
helptext="Select file containing the input to be transformed">
</widget>
</widgetlist>
</propertydialog>
This XML file defines the content of a Dialog-Window - these are not QiQu-Commands - it's rather a defnition for simple GUI in XML...
To use this dialog we will have to modify our script. Make a copy of "script09.qiq", name it "script10.qiq" and change it as follows: <?xml version="1.0" encoding="ISO-8859-1"?>
<QiQuScript>
<LoadDoc FileName="'script/dialog01.xml'" NewDocRef="$ldialog"/>
<ShowPropertyDialog GuiNodeRef="$ldialog"
PropFileName="'script/lastSavedValuesDialog01.xml'"/>
<If Condition="cancelbutton">
<Exit/>
</If>
<LoadDoc FileName="'script/script09.qiq'" NewDocRef="$script1"/>
<RunQiQuScript NodeRef="$script1"/>
<LoadDoc FileName="'script/script06.qiq'" NewDocRef="$script2"/>
<RunQiQuScript NodeRef="$script2"/>
</QiQuScript>
What did we do?
Save the script and run it - the following dialog should be displayed:
11 Managing your Properties / Using the Script Properties DialogThere is still an other possibility to manage the configuration of your QiQu script. The QiQu properties dialog allows you to manage your properties files, log level and many more. This makes it a lot easier to manage your various configrations. Let's have a closer look at it, shall we? To access the dialog, simply select the script file in the Navigator, open the context-menu (2nd mouse-button) and select Properties. As you can see below, you can also open the dialog with the hot key combination Alt+Enter.
After selecting
So what exactly can you define and specify in this dialog? Let's have a look at the different sections. 11.0.1 Launch Config NameHere you can specify a launch configuration name. This name will be displayed if you open
the eclipse "Run" shortcut. Of course you have to run your script at least once before you can use
the shortcut. Having done that, you will find your launch configuration name along with a QiQu logo
For example for our script file script.qiq, that belongs to the project TheQiQuTutorial the generated launch configuration name would be:
Please note: You will overwrite your launch configuration if you change some of your settings, but you don't change the launch configuration name. Your newly defined settings will be stored in your "old" launch configuration and your "old" settings are lost, i.e. overwritten. It is up to you to decide if it's useful to change the name of your launch configuration or not. To make sure you can use your current launch configuration later again it would be wise to assign a launch configuration name to it that differs from the last launch configuration name. 11.0.2 PathThis section shows the path of your script file, starting from the directory where your project is located in. 11.0.3 Properties FileYou can specify your properties file in this section (see also The Use Of Properties). Instead of referencing your properties file in a hard-coded manner, you can select your desired properties file in through dialog. This allows you to add an additional degree of flexibility to your scripts because you can easily change your properties file, or you can switch between two different properties files just by selecting the desired file in this dialog. The path of this file will be presented in a relative form starting at the project base directory. Please note: In order for a file to qualify as a property file, it must have the
extension 11.0.4 PropertiesInstead of defining an entire properties file, you can also simply specify one or more properties. Or you can do this to create some additional properties even if you already have defined a properties file. So how do you add these properties? This is made in the same way as you would do it in a properties file. Associate a value to a property and that's it. Easy, don't you think? As mentioned above, you can define multiple properties, all you have to do is seperate them by a semicolon. Example: Now we have specified two properties, input and output which are holding the values 11.0.5 BaseDirYou can define a new BaseDir. All your relative paths in your scripts will take this specified directory as their starting point. Please note: The specified base directory will be an absolut path, not a relative path based from your script file. 11.0.6 LogLevelIn this section of the dialog you can select one of the given log level. The provided options are 11.0.7 Add External JARsHere you can specify additional libraries that will be used when you run the script. Similar to the definition of a properties file this feature allows you to add a bit more flexibility to your script because you don't have to reference your external jars in a hard coded way. The number of libraries is not limited. Please note: It's possible that a user by accident includes a library more than once (which can happen if you add the same library in the preferences AND in the properties). But in that case the double referrenced library will only be included once. Below you can see an example of a properties dialog where all the properties have been set.  So what have we done here? We specified a name Please note: All your settings will take effect the first time you run your script, not before... Don't try to run your current configuration by the Eclipse Run shortcut. Read the next chapter to find out why. 11.1 The Eclipse Run dialog and the QiQu Script typeEclipse provides an easy way to manage your various launch configurations, the Eclipse Run Dialog. This dialog is accessible in multiple ways. One possibility is shown here:  When the eclipse run dialog is open, you will see the different configuration types, like All your properties settings from the properties dialog
(and from your QiQu Preferences as well; see Editor-Settings) are passed as arguments to the
QiQuScriptRun class. After running your script you can check your arguments (and add additional arguments as well) in the Eclipse Run dialog in the tab Please note: In order to keep this argument list as short as possible double occurrences of the same libraries will be deleted.  Along with the standard Java Application Tabs like This refresh option makes sense for instance if you'd like to have your  12 Putting the Generator into a single jarOk, we wrote the scripts, we created the templates and now we have a bunch of files lying in some directories inside our QiQu-project. However, the users of our generator don't want to receive a bunch of files, in order to be able to use the generator. The just like to have one single file. So what do we do? The answer is quite simple. Creating an ant script which puts everything into a single jar. The following ant script can be used in order to do this.
<project name="Build Generator Jar" default="default" basedir=".">

    <property environment="env"/>
    <property name="tempdir" location="${basedir}/temp"/>

    <target name="default" depends="createOutputDir,jarOutput">
    </target>

    <target name="createOutputDir">
        <delete dir="${tempdir}"/>

        <unjar dest="${tempdir}">
            <fileset dir="${qiqu.dir.lib.plugin}">
                <include name="*.jar"/>
            </fileset>
        </unjar>

        <copy todir="${tempdir}/velocity/template">
            <fileset dir="${basedir}/velocity/template"/>
    	</copy>

       	<copy todir="${tempdir}/script">
            <fileset dir="${basedir}/script/">
                <!-- copy the scripts -->
                <include name="**/*.qiq"/>
                <!-- copy property dialog definition files -->
                <include name="**/gui/*.xml"/>
            </fileset>
    	</copy>
    	<delete dir="${tempdir}/META-INF"/>
    </target>

    <target name="jarOutput" >
    	<jar basedir="${tempdir}" destfile="runtime/bomgenerator.jar" manifest="manifest.txt"/>
    </target>
</project>
The target "createOutputDir" copies all files to a temporary directory. It unjars also all needed jars from the QiQu-lib plugin. The appropriate ant property "qiqu.dir.lib.plugin" is automatically created when installing QiQu in eclipse (check the ant runtime preferences of eclipse). The second target "jarOutput" simply puts the temporary directory into a single jar. Keep the following rules in mind:
|


 so you can easily
identify your scripts. If you don't specify any launch configuration name, a name will be created
of the following pattern:
so you can easily
identify your scripts. If you don't specify any launch configuration name, a name will be created
of the following pattern:
